This is your complete DIY guide to performing a TRUBLUE iQ webbing replacement quickly and safely. As an operator, you can easily handle this essential maintenance task yourself without waiting for an annual service. Our guide first covers when to replace your webbing, with detailed wear tables and photos to help you during your required daily inspections. Then, we provide a clear, step-by-step tutorial that walks you through the entire replacement process, from removing the nozzle to seating the new webbing. Keep your auto belays in top condition and ensure climber safety with these simple instructions.
What You’ll Need
To replace the webbing, gather the following tools and materials, which are included in your webbing replacement kit:
- Allen key
- Shackle pin
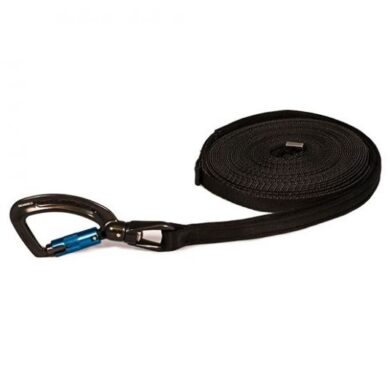
- TRUBLUE iQ Replacement Webbing
Additionally, having a flathead screwdriver on hand might be helpful.
WHEN TO REPLACE THE WEBBING ON YOUR TRUBLUE iQ AUTO BELAY
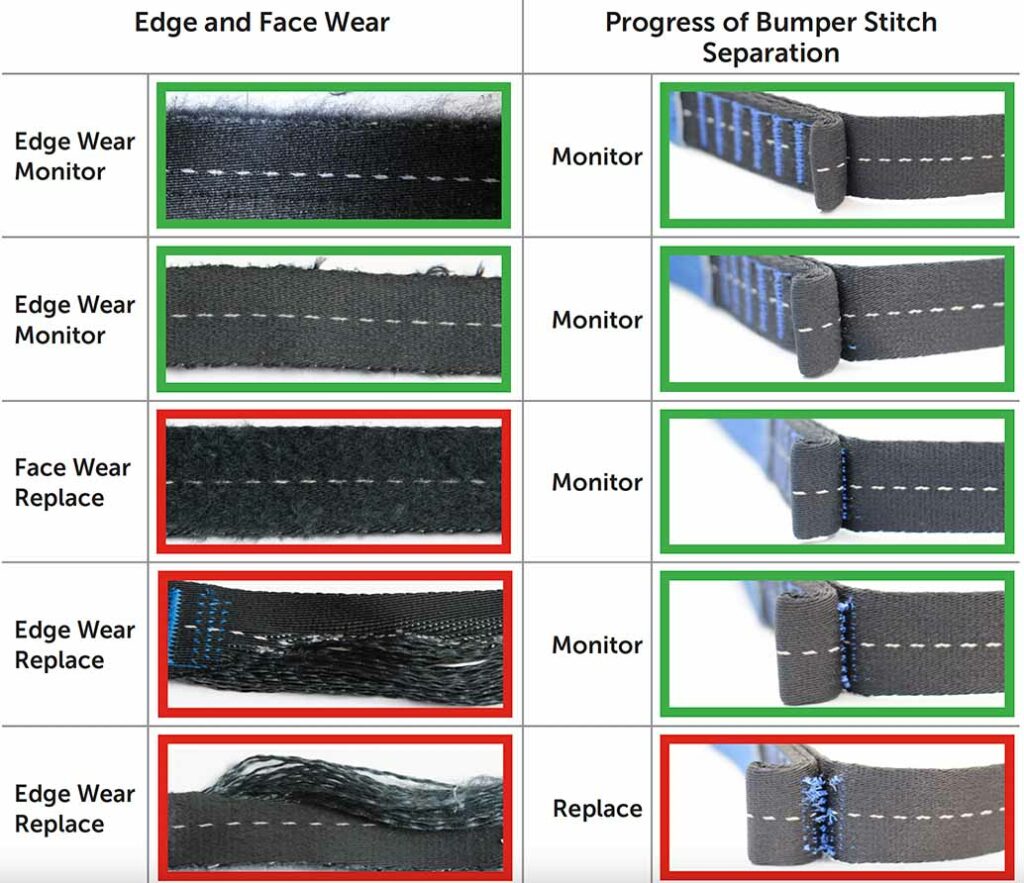
Daily webbing inspections are required for all TRUBLUE iQ Auto Belays. To help you to evaluate when your webbing wear is acceptable and when a replacement webbing is required, refer to the Wear Tables below. Refer to the TRUBLUE iQ Operator Manual for further information regarding webbing wear.
We strongly recommend replacing your webbing after 1.5 years of usage, regardless of wear. The date of manufacture of the webbing is located on the webbing tag inside the device near the shackle. When you first receive your replacement webbing, make sure to record this date in your inspection log. Continued use of webbing with wear at or beyond the designated stage of wear below could result in serious injury or death.
Wear Tables
Webbing pictures outlined in red in the tables below show webbing that MUST be taken out of service and replaced immediately to continue using your TRUBLUE iQ.
TROUBLESHOOTING WEBBING WEAR
| Symptoms | Potential Causes | Potential Solutions |
| BUMPERSTITCH DEPLOYED | Unit mounted low | Mount the unit higher or develop routes that minimize the impact of the bumper stitch on the Nozzle at the finish of the climb. |
| Normal use of the TRUBLUE iQ | The bumper stitch is designed to absorb impacts with the Nozzle. Over time,these impacts will bend the webbing andslowly pull out the stitches. Trim any loose threads. If the bumper stitch is completely unraveled, the webbing assembly must be replaced. | |
| WEBBINGFACE WEAR SIDE WEAR LOOPFAILURE& HAND GRIP WEAR | Webbing is rubbing on the wall (overhang or cornerof wall) | Move the TRUBLUE iQ so the webbing does not rub on the wall/corner. |
| Webbing is rubbing on a hold | Look for problem holds. Move the hold. Do not place large holds immediately below TRUBLUE iQ. | |
| Foreign objects, including dirt and/or dust have intro-duced damage to webbingassembly | Make sure to cover the TRUBLUE iQ when not in use. Wipe the webbing with a dry cloth daily, after use. | |
| Normal use of TRUBLUE iQ | Parts and webbing wear over time with normal operation, replace webbing as necessary. | |
| BAR TACK DAMAGED | Climbers are rubbing the bartack on holds or thewall | Monitor routes with the TRUBLUE iQ to minimize contact with holds or wall features while climbing. |
| UV FADED WEBBING | Sun is damaging webbing | Remove TRUBLUE iQ at the end of day or cover unit and webbing after use. Allow webbing to retract into the device when not in use. |
| HAND GRIP WEAR | Hand grip is rubbing against wall/holds | Look for problem holds. Move the hold. |
| Normal use of TRUBLUE iQ | Parts and webbing wear over time with normal operation, replace webbing as necessary. | |
| WEBBING ISMOLDY/DISCOLORED | Webbing is not being dried after being used in wet conditions | Whenever using the TRUBLUE iQ in wet conditions, take the unit down at the endof the day, extend the webbing in a sanitary environment, and allow webbing to dry outside of the unit. |
-
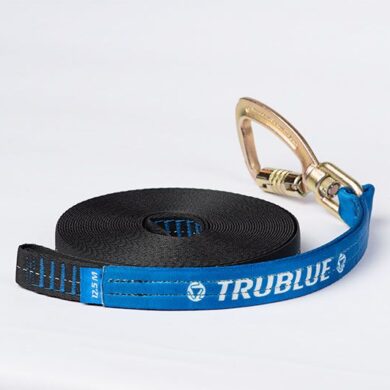
 TRUBLUE iQ Replacement WebbingPrice range: € 246,00 through € 504,00 Ex VAT
 -
TRUBLUE SPEED Replacement WebbingPrice range: € 277,00 through € 468,00 Ex VAT
-
TRUBLUE Replacement WebbingPrice range: € 236,00 through € 406,00 Ex VAT

WEBBING REPLACEMENT PROCEDURE
1. Remove the Auto Belay from service.
2. Remove the Nozzle assembly
- Place the Auto Belay unit with the flat plastic cover side down taking care not to damage the plastic side covers – Ensure it is secure and cannot fall.
- Pull out the Nozzle Pin.
- Pull out all the webbing. The short webbing assembly will push the two Nozzle halves out. Twist the webbing 90 degrees and pin the webbing.
- Slightly twist each Nozzle halve to release from the housing tab slot.
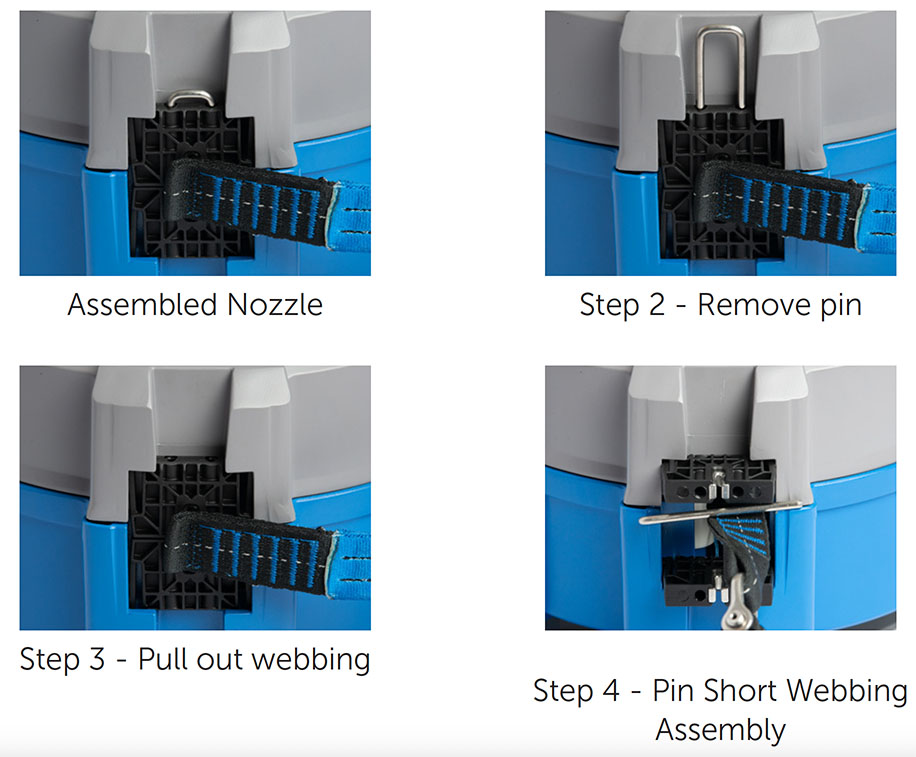
3. While holding Auto Belay securely, pull out the webbing line until the end of the short webbing loop and the joining shackle are exposed.
4. Locate the loop in the short webbing loop, approx. 150 mm (6 in) past the shackle. Twist webbing 90 degrees and place the Nozzle Assembly pin through the loop in the short webbing loop to prevent it retracting back inside the casing.
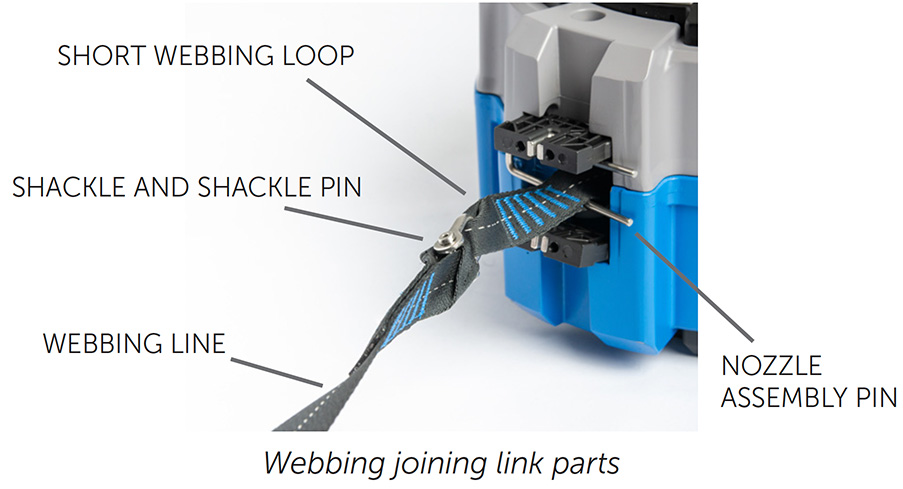
5. Unscrew the shackle pin.
6. Remove webbing and shackle pin from the short webbing loop.
7. Ensure the loop part of the shackle is fitted to the short webbing loop.

THREAD LOCKING COMPOUND
Ensure the factory applied thread locking compound is present on the shackle pin threads. Do not reuse the Shackle Pin.

WARNING
The TRUBLUE iQ can only use TRUBLUE iQ webbing. Do not use original TRUBLUE webbing, or any webbing from any other manufacture. Incompatible webbing may result in severe injury or death if used. The TRUBLUE iQ webbing has a white yarn down the center and is sold by authorized Head Rush Technologies locations.

8. Fit the new webbing line, passing the threaded shackle pin through the loop as shown below.
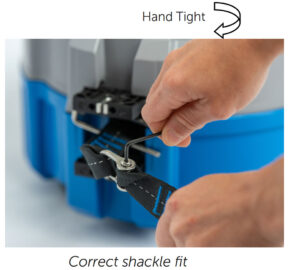
8. Tighten the shackle pin to hand tight, ensuring the threads are fully engaged and the end of the pin is flush with the joining shackle as shown.
9. Remove the holding pin, untwist the webbing 90 degrees, and allow the new line to slowly retract until short webbing loop and joining link is inside casing. Ensuring that the webbing line does not twist.
Once shackle pin is tightened, it must not be loosened or re-tightened. This will break the locking compound and the shackle pin may become loose. The shackle pin must be replaced if this happens.
Ensure that the webbing line feeds squarely and without twists when retracting back into the auto belay.
Failure to do so may result in equipment failure, serious injury or death to participants.
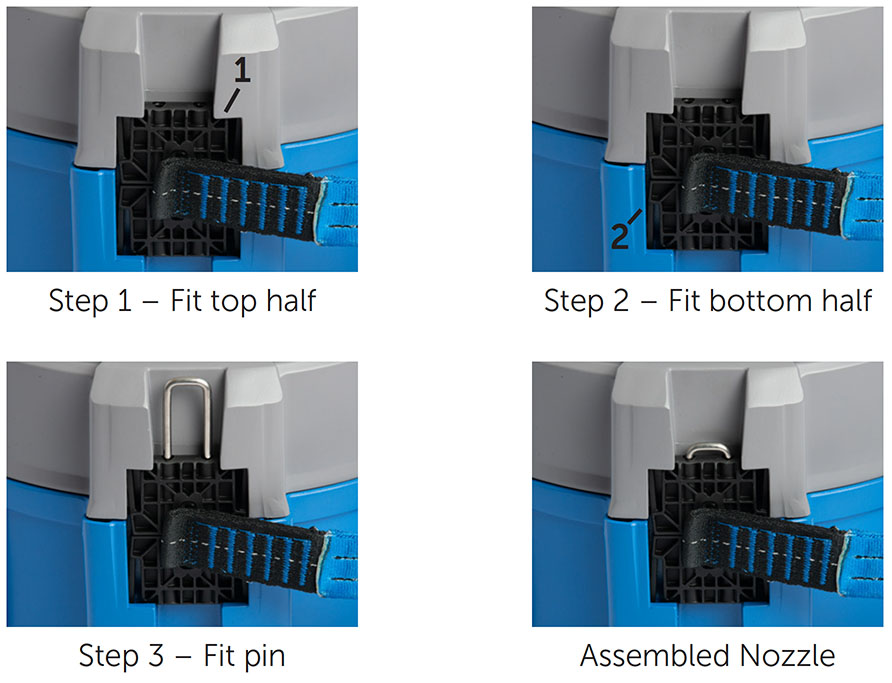
11. Refit Nozzle assembly.
- Refit the lower half of the Nozzle assembly into the recess on the casing.
- Fit the upper half of the Nozzle assembly.
- Remove the pin and untwist the webbing 90 degrees. Allow the webbing to slowly retract, and push the two Nozzle halves closed. Retract the webbing back into the device, tugging on the webbing every 1-2 meters to properly seat the webbing.
- Replace the pin through both Nozzle halves.
- Check Auto Belay for correct operation.
12. Slowly retract the webbing line into the casing, checking the action is smooth and adequate spring resistance is felt. Sharply tug on the webbing every 1-2m to cinch down the webbing onto the stack.
13. Once line is fully retracted, pull out line a short distance using reasonable force and allow it to retract. Repeat two to three times to ensure line is firmly wound onto the drum.
14. Return Auto Belay to service and check for correct retraction and descent.
That’s it! The new webbing is installed and your TRUBLUE iQ is ready for climbers.
Dive Deeper: Exploring Auto Belay Technology with Expert Insights
Auto belays are transforming the world of indoor climbing, offering convenience and safety for climbers of all levels. But how exactly do they work, and what are the key considerations for using them? To learn more about the intricacies of auto belay technology and gain valuable insights from experts in the field, check out our additional resources below…
- Comparison of Auto Belay’s: what’s new in the TRUBLUE iQ series
- Using Technology to Make Your Climbing Gym Accessible and Inclusive
- A Closer Look at the Auto Belay System
- Next Generation Auto Belay – TRUBLUE iQ
- Every modern climbing gym should have these 5 features
- Everything You Need to Know about Buying Auto Belays
- Increase Revenue and Customer Satisfaction at Family Entertainment Centers
- Catch-and-Hold: What is it and how does it work?
- Leading the Way in profitable and safe climbing
- Why Family Entertainment Centers Trust TRUBLUE Auto Belays
- Creating Value for Customers by Using an Auto Belay
- TRUBLUE iQ+ World’s first catch-and-hold auto belay
- Drive Revenue and Customer Satisfaction with Auto Belays
- 7 Ways Magnetic Braking Is Better Than Friction
- No Belayer Necessary: Understanding Auto belays
- Competitive Advantage of an Auto Belay
- ROI at Climbing Walls and Family Entertainment Centers
- Auto-Belay and hands-free climbing challenges
- Why using Auto Belays Boosts your Business
- The Science of Eddy Current Magnetic Braking
-
Product on saleTRUBLUE iQ+ Auto Belay | Catch-and-Hold Projecting TechnologyPrice range: € 4.465,00 through € 5.157,00 Ex VAT
-
Product on saleTRUBLUE Speed Auto Belay | Competition-Grade Speed Climbing SystemPrice range: € 2.845,00 through € 3.360,00 Ex VAT
-
Product on saleTRUBLUE iQ Auto Belay | Intelligent Magnetic Descent SystemPrice range: € 2.845,00 through € 3.465,00 Ex VAT